I was going to put this is resources but its more complicated then just importing the images 
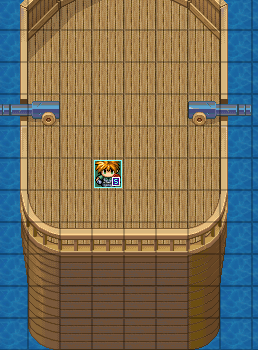
Mapping A Boat In VX
In this tutorial we will be making the above. I know its not much but it can be expanded on

.
You'll need the required resources. These have been tetrisfied(split up and squashed around a bit) by me
 TileE.png(unfourtunately this will take up most of your tile e image )
:

Whilst were here id like to point out that the rpgmaker xp default tileset was a rushed peice of rubbish where none of the tiles lined up however this was fixed by "Dorman T Relgn"
Import this into graphics/system using the resource manager inside rpgmaker vx
.
!boatparts.png

This is a character file
. Place it in graphics/characters using the resource manager.
NOTE: RENAME THE ABOVE FILE TO !boatparts.png photobucket doesnt like !s.!boatparts2.png

This is a character file
. Place it in graphics/characters using the resource manager.
NOTE: RENAME THE ABOVE FILE TO !boatparts2.png photobucket doesnt like !s.Now create a new map and bucket fill it with a water tile
.
Using parts from the tile E Layer of the map editor you can make the base of the boat eg.
To achieve the masts i have used the event layer to achieve Another 3 layers ontop of the boat's base. The mast itself is comprised of 8 events:

The event graphics are set to one square of the boatparts file. The ! on the front of the name disables rpgmakers default habbit of placing characters and evets 4pixels above the terrain layer
.
For items you want to be on the same layer as the character mirror this event page. This is for items you want the player to bump into:

Make sure it has no animations set to it or youll have a shapeshifting event
For items you want the player to be able to walk on eg. a bundle of rope:

for items you want the player to walk behind eg. the top of the mast:

There you go. Continue adding in events and youll eventually have a cool boat. Notice how horrible this fix is because rpgmaker vx went backwards in the way it handles tiles
.

 Light Style